
Important
Server–side are the systems that run on the server
Client–side is the software that runs on a user’s computer or mobile device
NZServers is not responsible for client-side software
An email client (client-side) is an app or software installed on your desktop computer or mobile phone.
Example Outlook is software normally installed on a desktop computer. This is known as an email client.
Apple Mail, Thunderbird are other examples of what email clients are.

Any software or app assumes you have the required skills to install and configure.
If you don’t have the skills to do this, NZServers can remote in by appointment and configure your email client.
(there is a min charge of 30 mins to remote in)
If you have a tech-savvy friend, they may be able to help you out.
The rest of the information on settings is a guide only.
To create a new email account, you will need access to CPANEL.
Please click on this link CPANEL Tutorial or use the Iphone settings below.
This article will explain how to set up your email on your iPhone.
- Navigate To The Mail Section In Settings
- Add An Account
- Enter the Account Information In the New Account Menu
- Save The Information
1. Navigate to the mail section in settings – click on settings to begin
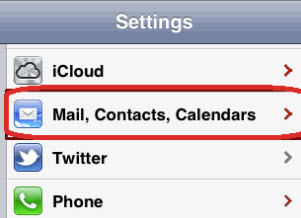
2. Click on “Mai, Contacts, Calendars”
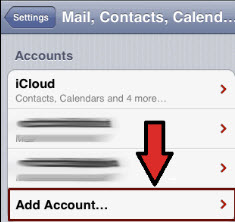
2. Add an Account
In the Accounts section click on Add Account.
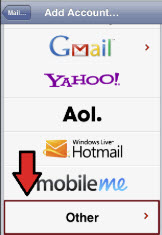
Choose your email account type ‘Other’ to work with NZServers
Add Mail Account under the Mail section
Name – example John Appleseed
Address – your full email address
Description – description to identify your email account
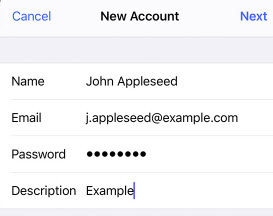
Click on Next
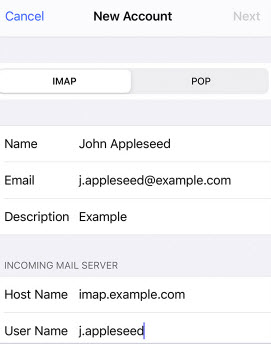
The iphone will attempt to find your email settings – you need to set these manually.
HostName: mail.yourdomain.com
User Name: username (full email address)
Password: [your password]
Outgoing Mail Server: mail.yourdomain.com
User Name: username (Full email address)
Password: [your password]
Click on the SMTP (Outgoing Mail server) and click on ‘Add Server’
Host name: mail.yourdomain.com
Username: Your full email address
Password:
Use SSL: Turn on
Authentication: click on it and select “password” – enter your password
Server Port: 465 or 587
Click done
How to set up an email account for the first time, or add another email account.
Choose other mail account instead of the standard email options.
Step 1: Add or Edit the Email Account
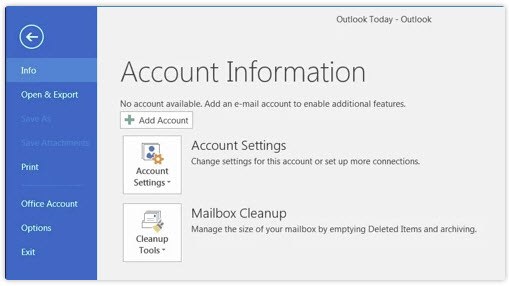
- To set up a new email account, click the File tab and then click Add Account.
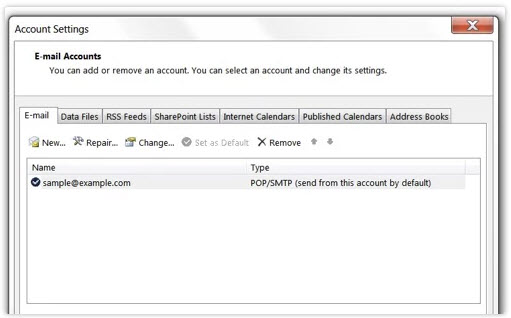
- If you’re modifying the settings on an existing account already configured in Outlook, click on Account Settings and then click on Change settings for this account or set up more connections and skip ahead to Modify Account
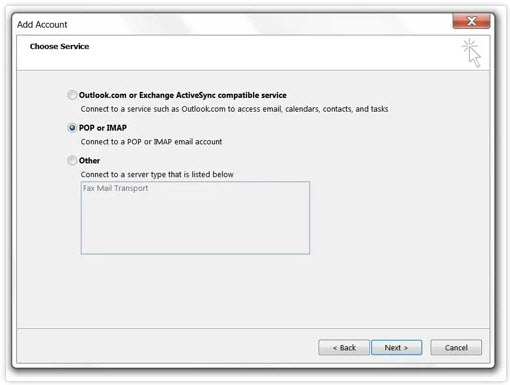
Step 2: Manual Setup for a New Email Account
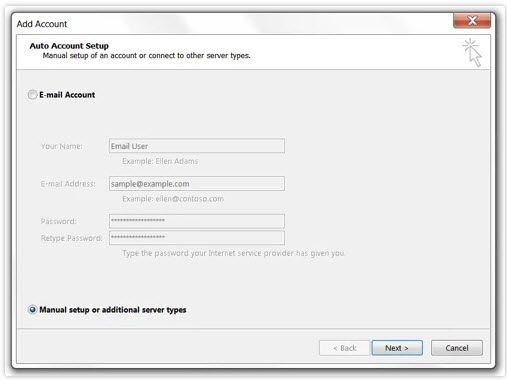
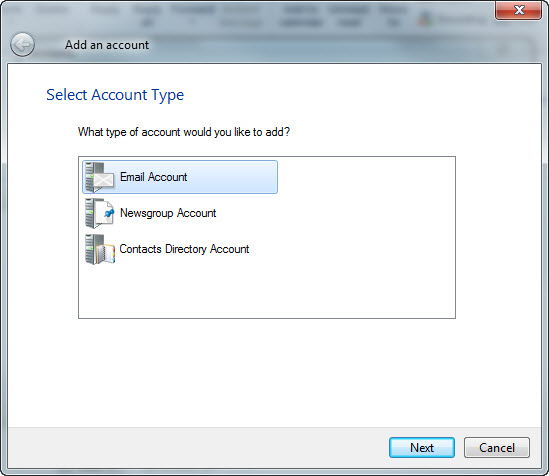
Step 3: Select Email Account Type
Step 4: Modifying an Existing Account
Removing an email account from a mail client also will remove all messages associated with it on the device and, specifically in the case of POP accounts that are not configured to retain mail on the server, there may be no way to recover those messages.
You cannot edit an existing email account to switch its account type from POP3 to IMAP or vice versa. To change the account type, you must add a new account of the desired type (POP3 or IMAP) per the Add or edit the email account instructions above. Adding a new account with a different connection type should not require you to delete the old one in most mail clients.
Step 5: Configure General Settings
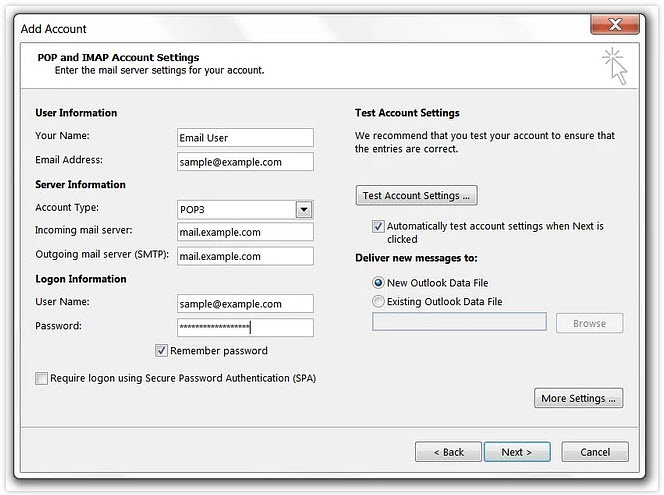
- Your Name is your name as you want it to appear in emails that you send
- Email Address should be the full email address
- Account Type will be POP3 or IMAP, depending on your preference. For its ability to keep email in sync across multiple devices (desktop, laptop, phones and tablets), IMAP generally is recommended.
- Incoming mail server
- When using standard (non-SSL) or (SSL) settings, use mail.yourdomainname.com
- When using secure (SSL) settings, you can use the server’s hostname (sv5.nzhost.net.nz)
- Outgoing mail server (SMTP)
- When using standard (non-SSL) settings, use mail.yourdomainname.com
- User Name is your full email address, not just the part before the at symbol.
- Password is the email account password.
- Require logon using Secure Password Authentication (SPA) must not be checked. SPA is not the same as SMTP authentication, which is used on cPanel servers.
Step 6: Configure Outgoing Server Settings
Click the More Settings button, and select the Outgoing Server tab.
- My outgoing server (SMTP) requires authentication should be checked
- Use same settings as my incoming mail server should be enabled
- Log on to incoming mail server before sending mail (POP3 only) should not be enabled. That setting applies only to servers configured to allow POP Before SMTP authentication, in which a successful login to retrieve mail allows a user from the same IP address to also send mail for a period of time. It is not compatible with servers requiring SMTP authentication.
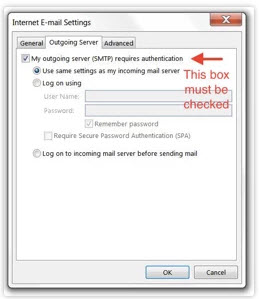
The port settings are covered above under Secure Email Settings or Non SSL settings
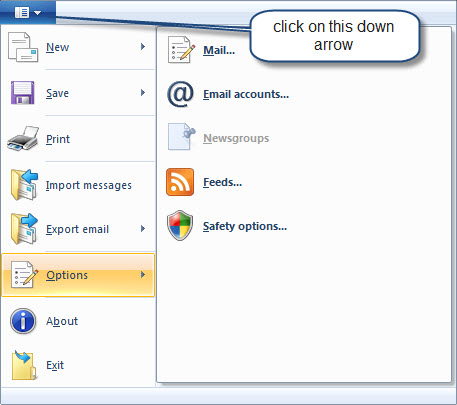
You need to click on the small down arrow in the top left-hand corner which will open up the options required. Click on the Options tab and select Mail.
Add a New Email
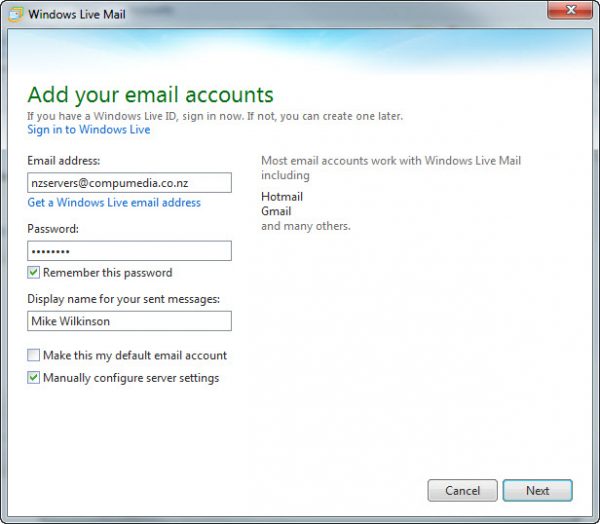
Manually Configure server settings If you want this to become the default email A/C select the default option Click Next
Note replace nzservers@compumedia.co.nz with your own email account
Click on Next
Authentication – use clear text
Configure server settings
Please refer to the SSL and Non SLL settings
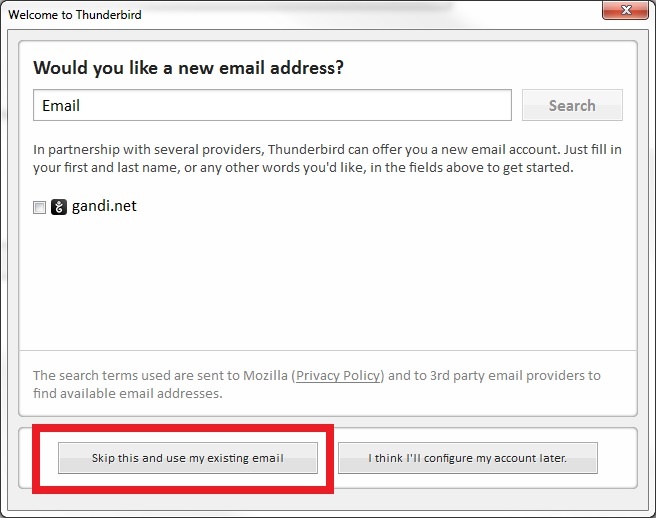
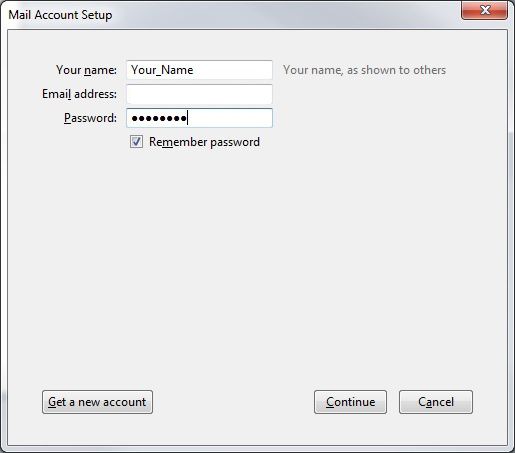
1. Open Mozilla Thunderbird.
2. Select “Email” under the “Create a new account” section.

3. Click “Skip this and use my existing email”
4. Enter your name in the field provided for the ‘From’ section. This displays your name when sending an email.
5. In the “Email address” field, enter your full email address in all lowercase (for example: johndoe@yourdomain.com). In the password field, enter the email account’s password. Check “Remember Password” to skip entering your password each time you connect to your email account.
6. Click “Continue”.
7. Select IMAP as the type of Incoming Server if you plan to sync email between your devices. POP3 should be used if you would like to download all emails from the email server to your computer and not have access to them using WebMail, your mobile device. tablet or outside ThunderBird.
8. Type mail.yourdomain.com into the hostname lines for both the incoming and outgoing field. You can also use the name of the server your email is hosted. You can find the name of the server in your cPanel >> Server Information. The default POP incoming port is 995 and the default IMAP incoming port is 993.
9. The outgoing port needs to be set to 465.
10. The username setting will be your email address in all lowercase letters.
11. Make sure to enable SSL/TLS for both servers, and leave the “Authentication on Normal Password” enabled for both.
12. Click on the “Re-test” button to check whether you are able to successfully connect and create your account.

Email address – your full email address
Username (Incoming/Outgoing) – your full email address